

The Vertex Lite Roof Tent from OEX is here! Designed to attach securely to the top of your vehicle, this comfortable off-ground sleeping area can be set up in seconds making overnight camping missions a breeze! Continue reading to learn how to set up your Vertex Lite, find out if it’s suitable for your vehicle and to have your key questions answered! Plus, you can watch this video below, to see exactly how it’s set up.
Is the Vertex Lite suitable for my vehicle?
The OEX Vertex Lite is designed to work on almost every vehicle with roof bars. Your vehicle and roof bars’ suitability is something to consider before purchasing a roof tent. There are some important details you’ll need to check:
1. Roof Bar Dynamic Load Rating:
“Dynamic load” is the maximum weight that can be carried by the roof bars when the vehicle is driven. The number is purposely low because of the additional forces applied to the vehicle by breaking, cornering and bumps in the road. We recommend that your roof bars and/or roof rails should have a minimum dynamic load of 50Kg.
2. Roof Bar Static Load Rating:
Along with the dynamic load, it’s important to consider the “static load”. As the name suggests, it is the load capacity of the bars when the vehicle is not moving. The static load will always be considerably larger than the dynamic load – typically, it is between three times greater. This is the limit that the combined weight of the tent and occupants should not exceed. Exceeding the weight limit can lead to damage to the vehicle or the roof rack itself and can also pose a safety hazard. When using the tent for two adult occupants the dynamic load should be at least 75Kg. As a guide: If your Roof Bars have a maximum dynamic load of 75kg, this would mean a maximum static load of 225kg, minus the Roof tent weight of 37.5kg. Leaving an available load of 187.5kg. This is only a guide though, please check your roof bar manufacturer’s specifications.
3. Roof Bar Depth:
Roof bars come in various types, with different fittings, sizes and materials depending on their intended use. The depth of your vehicle’s roof bars, or racks can vary depending on the brand and model, but generally ranges from around 1.5 inches (3.8 cm) to 3 inches (7.6 cm). The U-shaped brackets will fit a bar with a maximum depth of 55mm and a minimum depth of 25mm.
Note: It may be possible to purchase longer bolts (not available from manufacturer) to increase the depth. Narrower bars could be packed-out with rubber strips. However, OEX accepts no responsibility for damage resulting from modifications used to fit roof bars outside of the maximum and minimum bar depth.
4. Roof Bar Style:
Thule, the number one roof bar system manufacturer, cautions against using its clamp or edge style roof racks for its roof tents because of the high static load. Any kind of slider rails are also advised against. Thule recommends using supporting blocks when mounting to a car with raised roof side rails – please research the correct placement of blocks beforehand.
Other considerations: Roof tents should not be used on glass roofed (panoramic) cars but sunroofs are okay.


Your questions answered…
Is it easy to install the Vertex Lite on my vehicle?
The first thing to note about the Vertex is that it weighs just 37.5 kg, which includes its telescopic ladder. It is extremely lightweight Vs other roof tents on the market. Despite its low weight, we recommend that the lifting part of the installation process is carried out by at least two people or by using a hoist. Once the roof tent is correctly positioned on the vehicles roof bars the installation process is a matter of correctly installing and tightening a handful of bolts. No tools are required.
How do I install the roof tent?
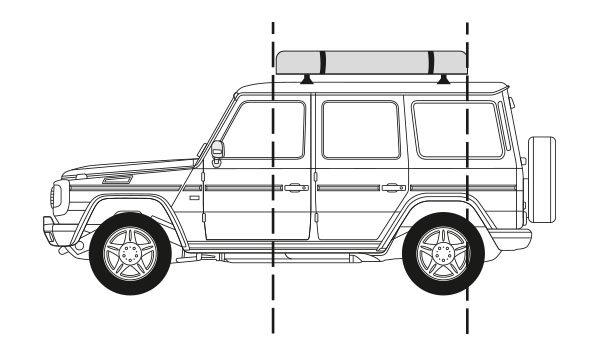
Once you’ve ensured your vehicle’s roof bars [1] are secure and parallel, the Vertex Lite should be lifted by two people (or a hoist) and slid on from the side, onto the roof bars. Ensure it sits in line with the centre of your car so not to obstruct the boot (tailgate) when opened.
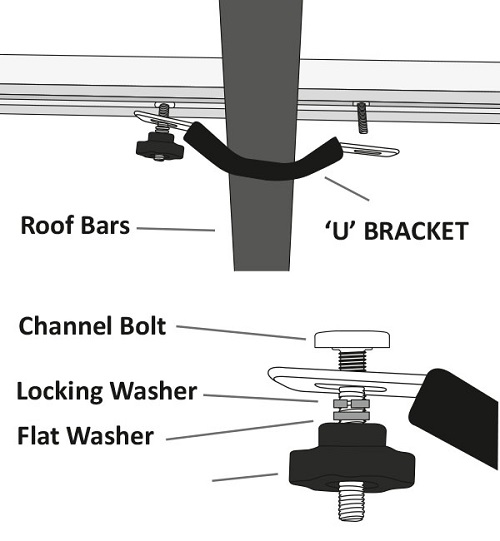
Once the Vertex is placed and aligned correctly on your vehicle and the two supporting rails of the Vertex are at 90 degrees to the roof bars, you’re ready to secure them together using the four U-shape brackets.
- Insert the channel bolts facing downwards through the support rail. These are used to attach the U-shape brackets to the support rails and fasten the roof tent to the roof bars
- The channel bolts should always be fastened using the components in the correct order:
- First, insert the ‘U’ bracket into the two-parallel downward-facing channel bolts
- Next is the locking washer
- Then the flat washer
- Finally, the larger hand screw nuts
- Once both hand screw nuts are tightened, and the U bracket is secure
Once all four U bracket points (8 screw nuts) are secured to the vehicle’s roof bars, repeat the tightening of each bracket as the tightening process of one side can sometimes loosen the adjacent side.
Bumps and vibrations from driving the car, especially when off-roading to your camping spot, can cause the nuts to loosen. Regularly check and tighten the hand screw nuts to ensure they remain tight and secure. The Locking Washer should prevent loosening, but varying road conditions cannot be accounted for, and bolts can and do occasionally loosen – it is best to play it safe.
It’s also important to consider the firmness of the ground you’re parking on, and whether the ground is level and dry. This will be important for the stability of the ladder – setting up on overly soft ground will ultimately affect the level of support of your roof tent.
OEX takes no responsibility for improper installation or use of this product on its own or in conjunction with a third-party roof bar supplier.

How long does it take to pitch the OEX Vertex Lite roof tent?
The speed of pitching is one of the best things about roof tent camping! It’s easy to pitch the Vertex Lite in a matter of minutes.
How do I pitch the OEX Vertex Lite roof tent?
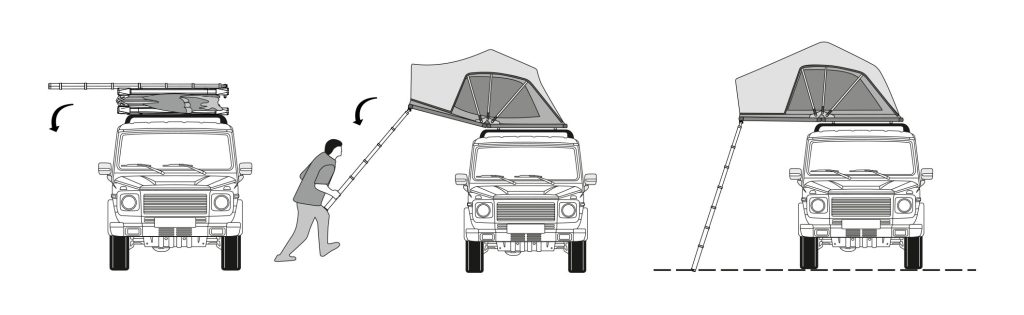
1) Remove the transit cover and ladder straps and begin to extend the telescopic ladder, ensuring each section is fully pulled down and locked in place.

2) Simply pull down on the now fully extended ladder to unfold the base and in turn unfurl the roof tent.
3) Position the ladder at a 75-degree angle to ensure maximum support and stability. Ensure the ladder is supporting the load and that the tents base is flat, not hyperextended. Note: The Ladder is also a support for the tent overhang, so ensure it is firmly in place.
4) Now your Vertex is stable, ascend the ladder to further extend the canopy and lock it into place using a single-button telescopic pole, making the canopy taught.
5) Finally, undo the mattress fasteners, unfurl the mattress, and store them away in the built-in pockets, hang your external boot bags on either side of the ladder and your rooftop adventure base is all set.

Looking for more inspiration? Head to our blog to read more unbeatable content from us!
